Raising chickens at home is a rewarding hobby, and hatching your own eggs can be an exciting step for any backyard farmer. If you’re looking for an affordable, hands-on way to incubate eggs without investing in expensive equipment, a homemade egg incubator using a water bottle is a fantastic option. This DIY project is simple, budget-friendly, and perfect for small-scale hatching. In this guide, we’ll walk you through how to build a homemade egg incubator using a water bottle, ensuring your eggs have the best chance to hatch into healthy chicks.
Why Use a Homemade Egg Incubator?
Building your own egg incubator is not only cost-effective but also a great way to learn about the hatching process. According to the University of Illinois Extension, successful egg incubation requires consistent temperature, humidity, and ventilation—conditions you can achieve with simple household items. A water bottle incubator is ideal for small batches of eggs (1–3 eggs), making it perfect for beginners or those testing the waters of poultry farming. Plus, it’s a fun project that can involve the whole family!
Benefits of a DIY Water Bottle Incubator
- Affordable: Uses everyday materials like plastic bottles and light bulbs.
- Compact: Fits easily in small spaces, unlike commercial incubators.
- Educational: Teaches kids and adults about chick development.
- Sustainable: Repurposes items you already have at home.
Materials You’ll NeedBefore you start, gather the following items. Most of these are likely already in your home, keeping costs low. If you need to purchase anything, local hardware stores or online retailers have affordable options.
- Large plastic water bottle (2-liter or larger): Ensure it’s clean and free of chemicals.
- Small light bulb (15–25 watts): Provides gentle heat.
- Light bulb socket with cord: Make sure it’s compatible with your bulb.
- Thermometer: To monitor temperature (digital ones are most accurate).
- Small fan (optional): For air circulation, like a mini USB-powered fan.
- Clean sponge or cotton cloth: To maintain humidity.
- Scissors or utility knife: For cutting the bottle.
- Tape or glue: To secure components.
- Small container of water: For humidity control.
- Clean towel or foam: To cushion eggs and stabilize the bottle.

Step-by-Step Guide to Building Your Incubator
Follow these steps to create a functional egg incubator. Be patient and precise, as small details like temperature control are critical for successful hatching.
Step 1: Prepare the Water Bottle
- Rinse the water bottle thoroughly to remove any residue.
- Cut the top third of the bottle off using scissors or a utility knife (adult supervision required).
- Keep the cap on the bottle to maintain a sealed environment.
- Smooth any sharp edges with sandpaper or tape to prevent injury.
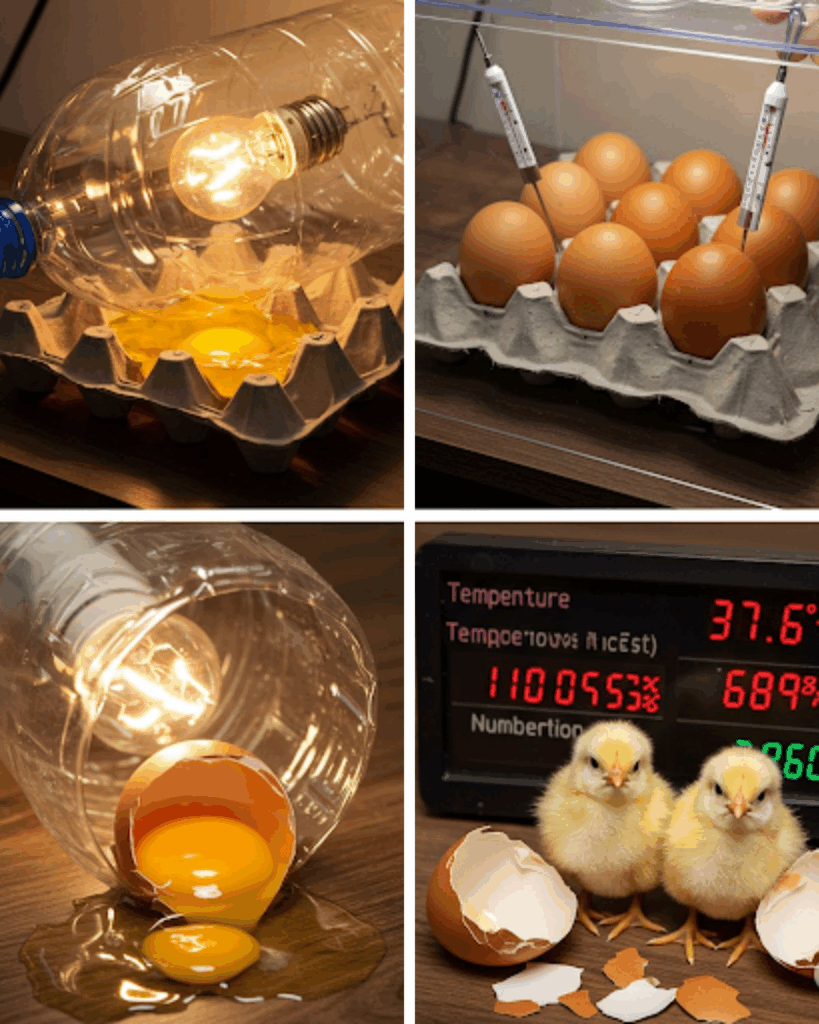
Step 2: Set Up the Heating System
- Attach the light bulb to the socket and place it inside the bottle, near the bottom.
- Secure the bulb so it doesn’t touch the plastic directly (use tape or a small stand).
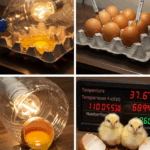
- Plug in the bulb and test the heat output. The goal is to maintain a temperature of 99–101°F (37–38°C), as recommended by the Cornell University Cooperative Extension.
- Place the thermometer near where the eggs will sit to monitor temperature accurately.
Step 3: Add Humidity Control
- Place a small container of water or a damp sponge inside the bottle.
- Aim for 50–60% humidity during incubation, increasing to 65–70% during the final days before hatching (use a hygrometer if available).
- Check the sponge daily and add water as needed to maintain moisture.
Step 4: Ensure Ventilation
- Poke 3–5 small holes in the sides of the bottle for airflow, as proper ventilation prevents harmful gas buildup.
- If using a fan, position it to gently circulate air without cooling the eggs.
- Avoid sealing the bottle completely, as chicks need oxygen to develop.
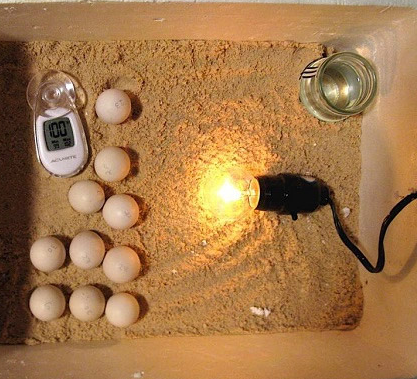
Step 5: Create a Safe Egg Bed
- Line the bottom of the bottle with a clean towel or foam to cushion the eggs.
- Place 1–3 eggs gently on the bed, ensuring they don’t touch the bulb.
- Position eggs with the pointed end slightly downward, mimicking their natural orientation.
Step 6: Test and Adjust
- Turn on the light bulb and let the incubator run for 24 hours to stabilize temperature and humidity.
- Adjust the bulb’s position or wattage if the temperature is too high or low.
- Check that humidity levels are consistent by observing condensation inside the bottle.
Tips for Successful Egg Incubation
Hatching eggs requires careful attention to detail. Here are some expert tips to maximize your success, based on advice from poultry specialists at Purdue University:
- Turn eggs daily: Gently rotate eggs 3–5 times a day to prevent the embryo from sticking to the shell. Mark one side with a pencil to track rotations.
- Maintain consistent conditions: Sudden changes in temperature or humidity can harm developing embryos.
- Choose fertile eggs: Only fertile eggs from a rooster and hen will hatch. Store eggs at 50–60°F before incubating, and use eggs less than 7 days old for best results.
- Be patient: Chicken eggs typically take 21 days to hatch. Don’t open the incubator too often, as this disrupts conditions.
- Candle eggs (optional): After 7–10 days, shine a flashlight through eggs in a dark room to check for embryo development (visible veins indicate progress).
Common Mistakes to Avoid
Even with the best intentions, mistakes can happen. Here’s how to steer clear of common pitfalls:
- Overheating: Temperatures above 102°F can kill embryos. Check the thermometer regularly.
- Low humidity: Dry conditions can prevent chicks from breaking through the shell. Keep the sponge moist.
- Poor ventilation: Without airflow, carbon dioxide can build up, harming chicks.
- Skipping egg turning: Failing to rotate eggs can lead to malformed embryos.
What to Do When Chicks Hatch
Once your eggs start hatching, resist the urge to interfere. Chicks may take 24–48 hours to fully emerge, and helping them can cause harm. After hatching, keep chicks in the incubator for another 12–24 hours to dry off and gain strength. Then, transfer them to a brooder (a warm, enclosed space with a heat lamp, food, and water). The University of California Agriculture and Natural Resources recommends maintaining a brooder temperature of 95°F for the first week, decreasing by 5°F weekly.
Share Your Success!
Hatching your own chicks is a joyful experience. Share this guide with a friend who loves DIY projects or comment below with your favorite poultry tip!
Final Thoughts
Building a homemade egg incubator using a water bottle is an accessible way to start your chicken-hatching journey. With simple materials and careful monitoring, you can create a cozy environment for your eggs to thrive. While this DIY approach may not match the precision of commercial incubators, it’s a rewarding and educational project for any homesteader. Explore more homesteading tips on our site, and happy hatching!
Disclaimer: This article is for informational purposes only and does not substitute professional veterinary or agricultural advice. Consult a poultry expert or veterinarian before attempting to incubate eggs or raise chicks.